Bulk import students (CSV)
Import hundreds of students at once from a spreadsheet. This guide walks you through every step of the 6-step wizard — from downloading the template to reviewing your results — so you can get your entire student body loaded quickly and accurately.
Before You Start
What you'll need
- Spreadsheet software — Microsoft Excel, Google Sheets, or LibreOffice Calc
- Student data ready — names, dates of birth, gender, and enrollment dates at minimum
- Permission — your account must have the Students › Create permission. If you see a locked tab, contact your system administrator.
- School selected — make sure you have selected the correct school in the top navigation bar before opening the import page.
Supported file formats
| Format | Extension | Notes |
|---|---|---|
| CSV (comma-separated) | .csv | Universal; works in any spreadsheet app |
| Excel workbook | .xlsx | Recommended; preserves formatting and dropdowns |
| Legacy Excel | .xls | Supported but .xlsx is preferred |
Files larger than 10 MB are rejected. Split very large cohorts into batches of 500–1 000 rows per file.
How to Open the Import Wizard
- In the left sidebar, click People.
- Click Import in the People sub-menu.
- The Students tab is selected by default.
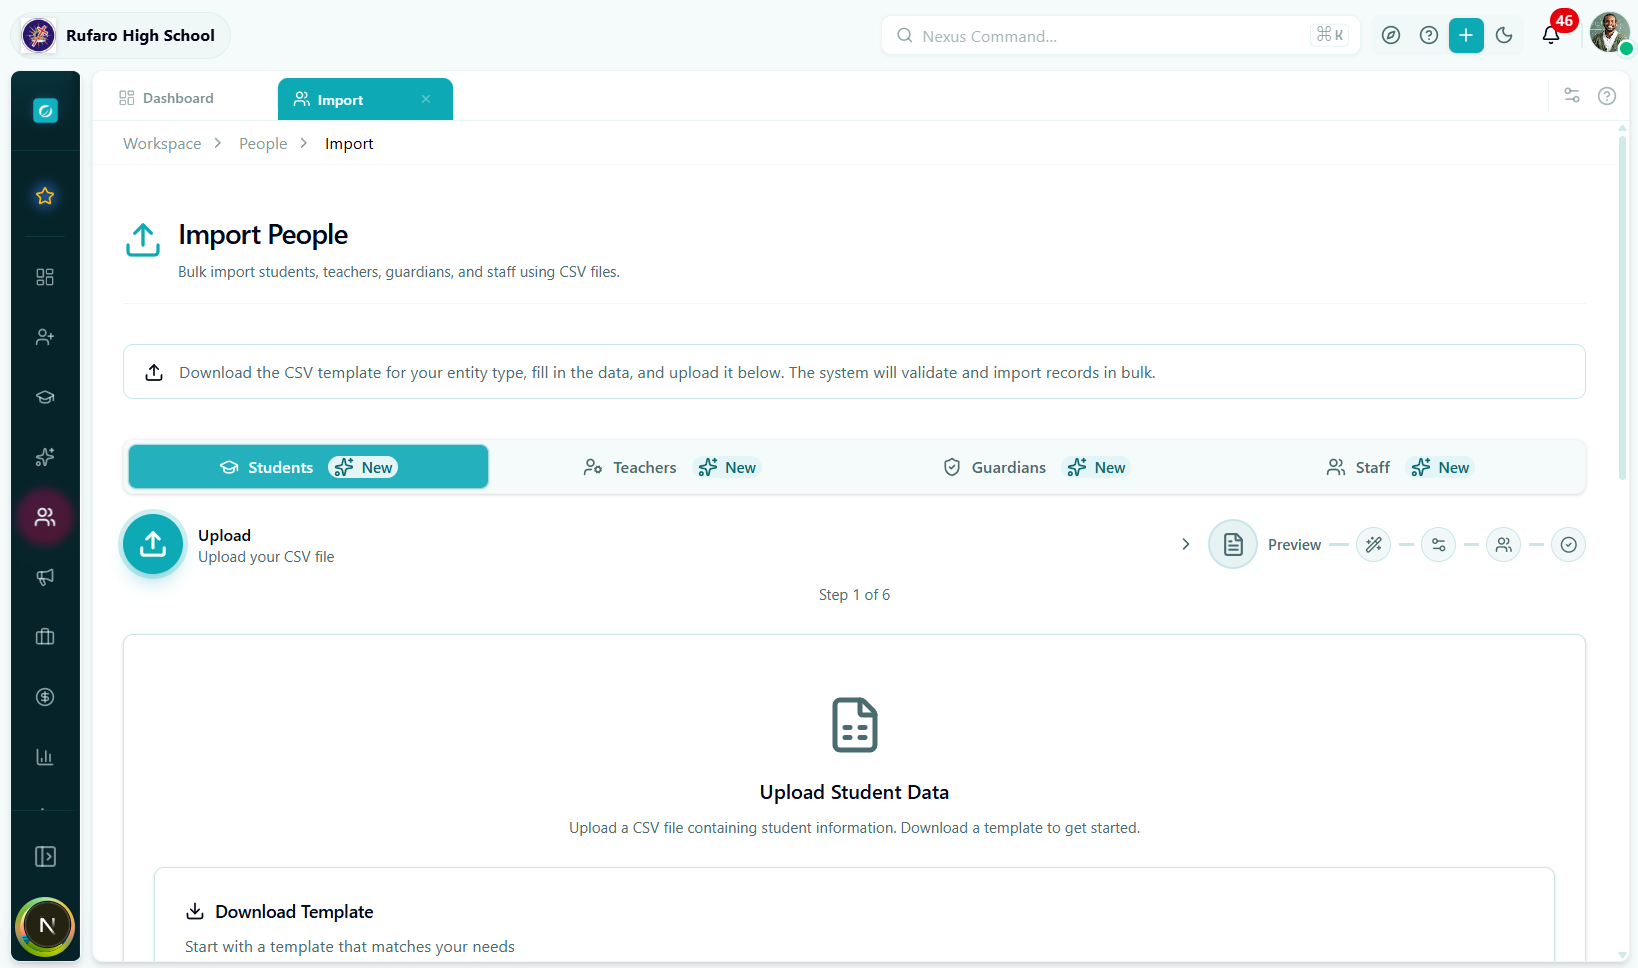
Step 1 — Upload
This is the starting screen of the wizard. You have two actions available.
Option A: Download the template first (recommended)
Click Download Template to get a pre-formatted Excel file.
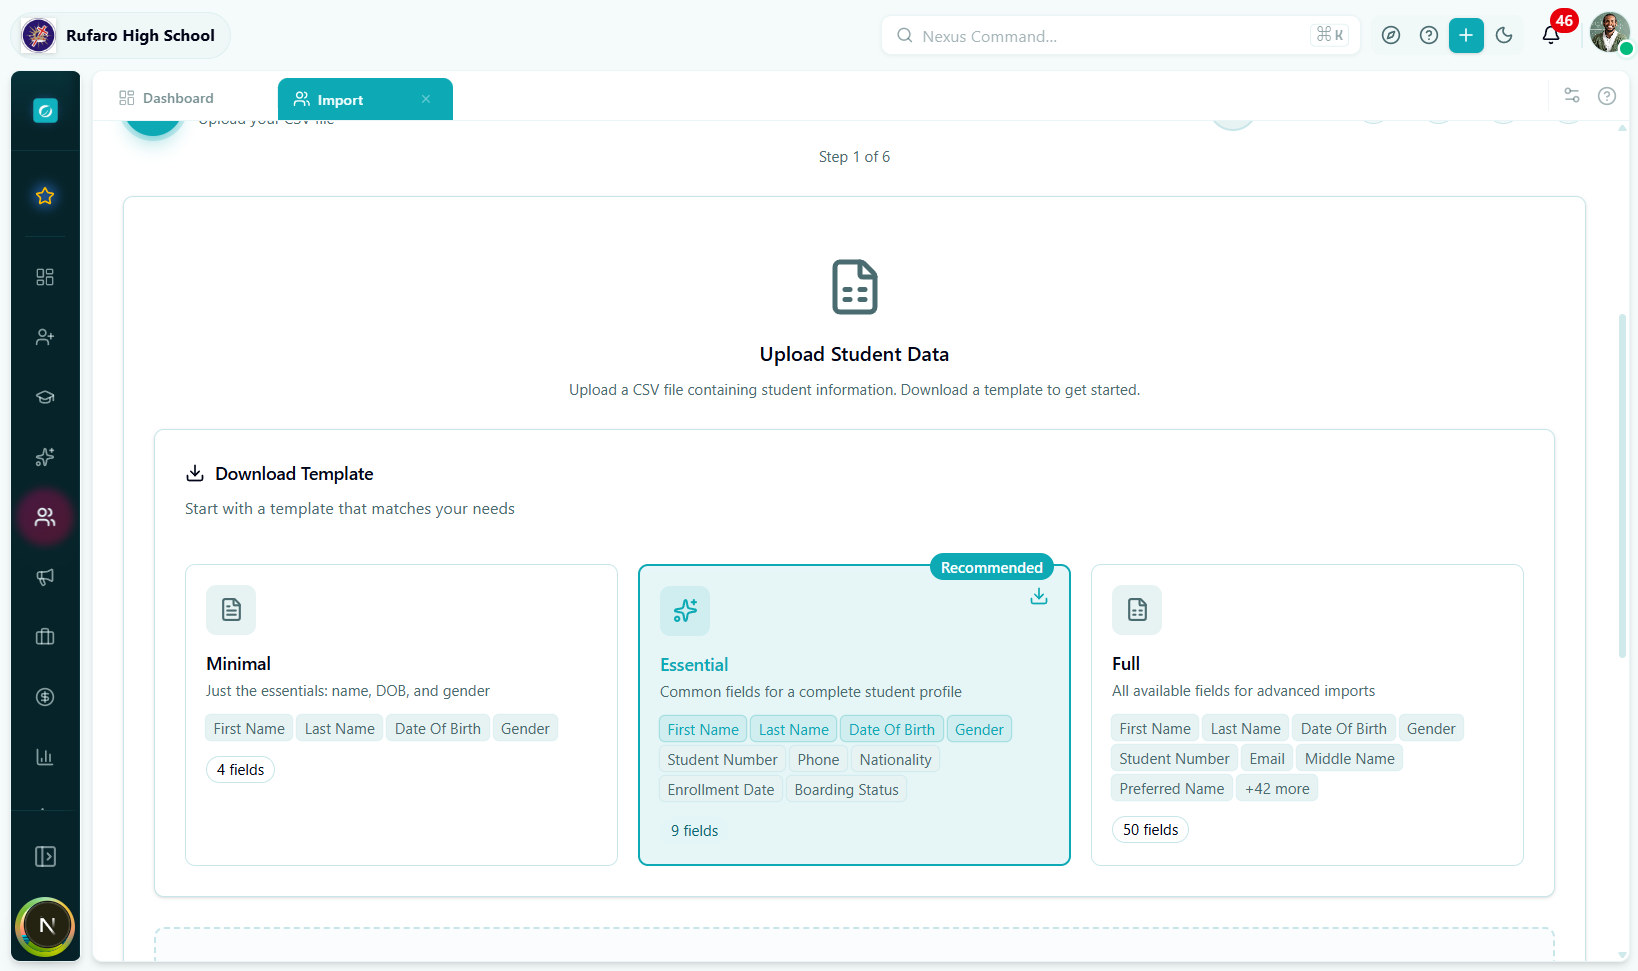
The downloaded template contains:
- Sheet 1 – Data: column headers with colour-coded required (blue) vs. optional (grey) columns, a row of format hints, and three sample student rows.
- Sheet 2 – Field Reference: full descriptions, accepted values, and data-validation dropdowns for every column.
Before filling in data, read Sheet 2. It lists every accepted value for fields like gender, boardingStatus, and enrollmentStatus so you don't have to guess.
Option B: Upload your own spreadsheet
If you already have a student list in a different format, you can upload it directly. The system will map columns by name (case-insensitive).
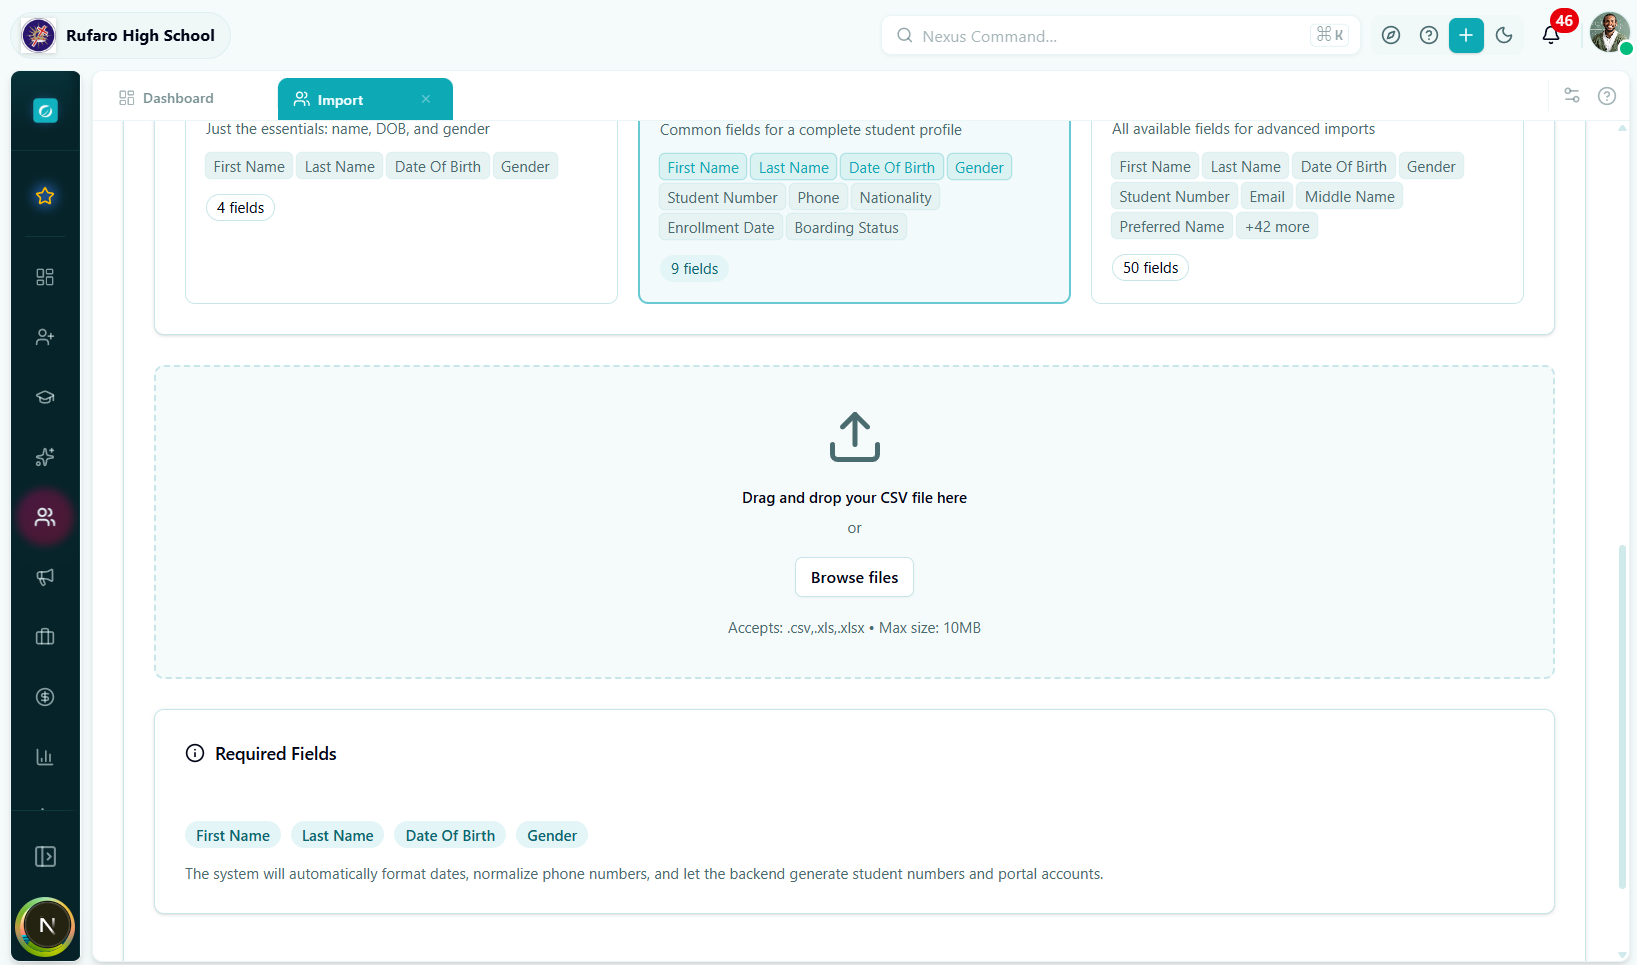
To upload a file:
- Drag and drop the file onto the blue upload zone, or
- Click Browse files and select your file.
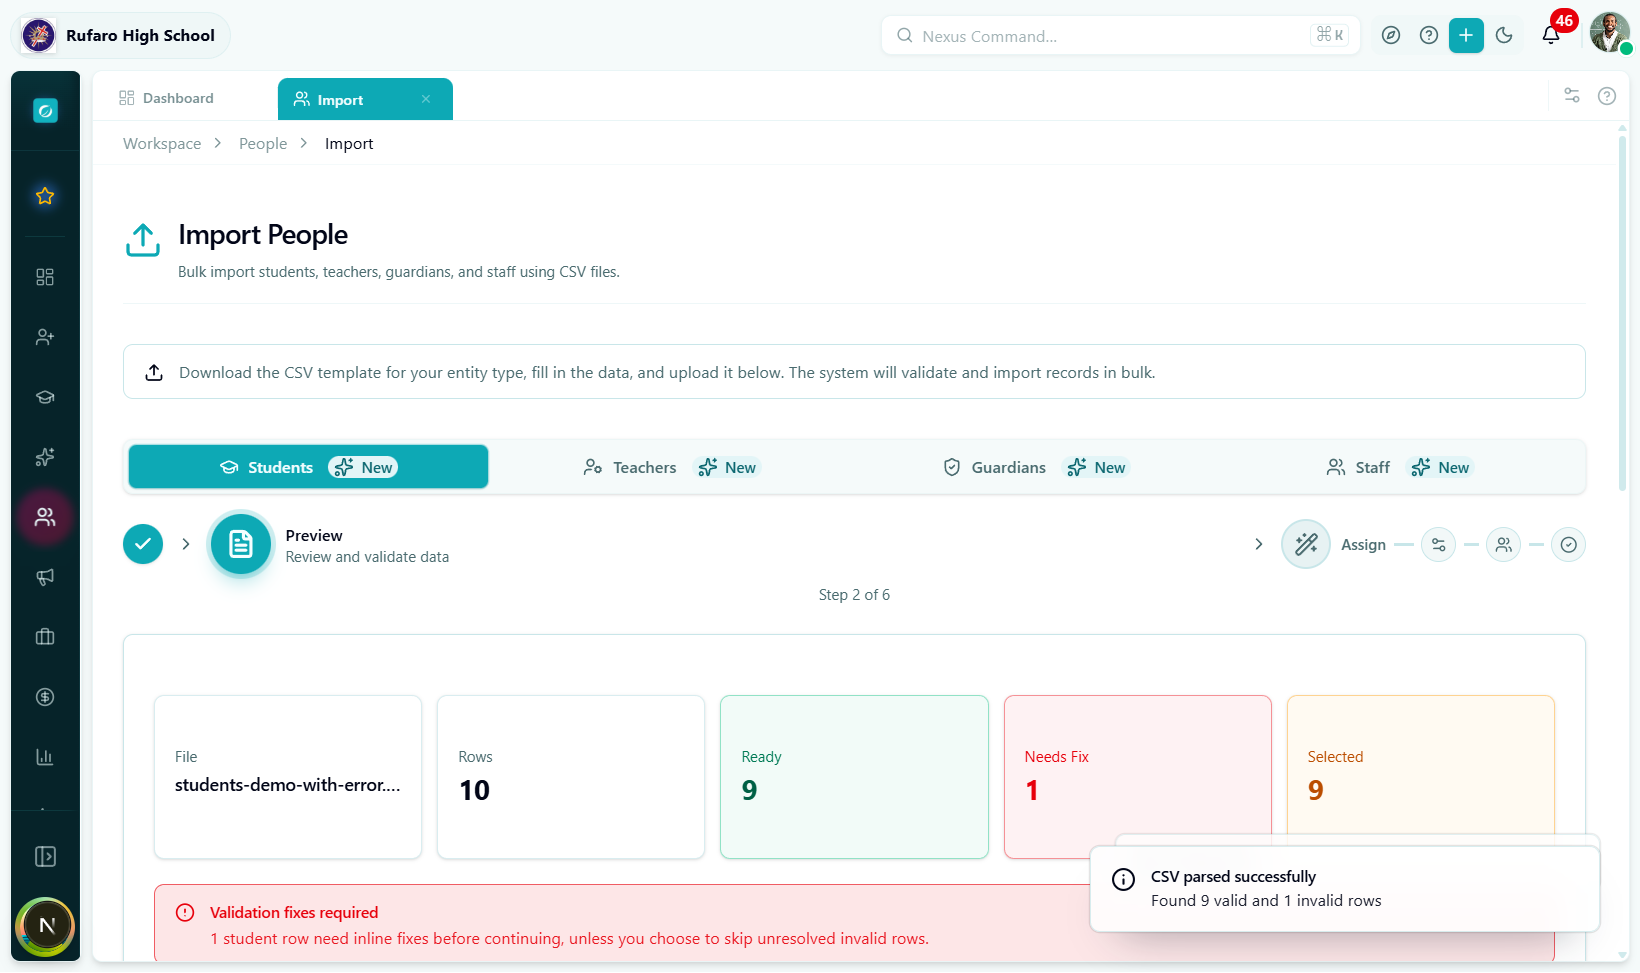
What happens immediately after upload:
- The file is parsed in your browser (no data is sent to the server yet).
- Required columns are checked. If any are missing, a red alert lists the missing headers.
- Valid rows are counted and shown as a green badge.
Required columns
These four columns must be present in your file or the upload will be rejected:
| Column | Description | Example |
|---|---|---|
firstName | Student's first name | Tatenda |
lastName | Student's surname | Moyo |
dateOfBirth | Date of birth | 2010-03-15 or 15/03/2010 |
gender | Gender identity | male, female, or other |
If you see "Missing required columns: dateOfBirth, gender", your spreadsheet headers don't match. Check for typos, extra spaces, or different capitalisation. The system is case-insensitive, but spelling must match exactly.
Accepted date formats
The system accepts multiple date formats and converts them automatically:
| Input format | Example | Notes |
|---|---|---|
| ISO 8601 | 2010-03-15 | Preferred |
| Day/Month/Year | 15/03/2010 | Common in Zimbabwe |
| Month-Day-Year | 03-15-2010 | US format |
| Excel serial | 40221 | Auto-converted from Excel date cells |
Gender values
| Accepted values | Stored as |
|---|---|
male, m, man, boy | male |
female, f, woman, girl | female |
| anything else | other or prefer_not_to_say |
Click Next to proceed to the Preview step.
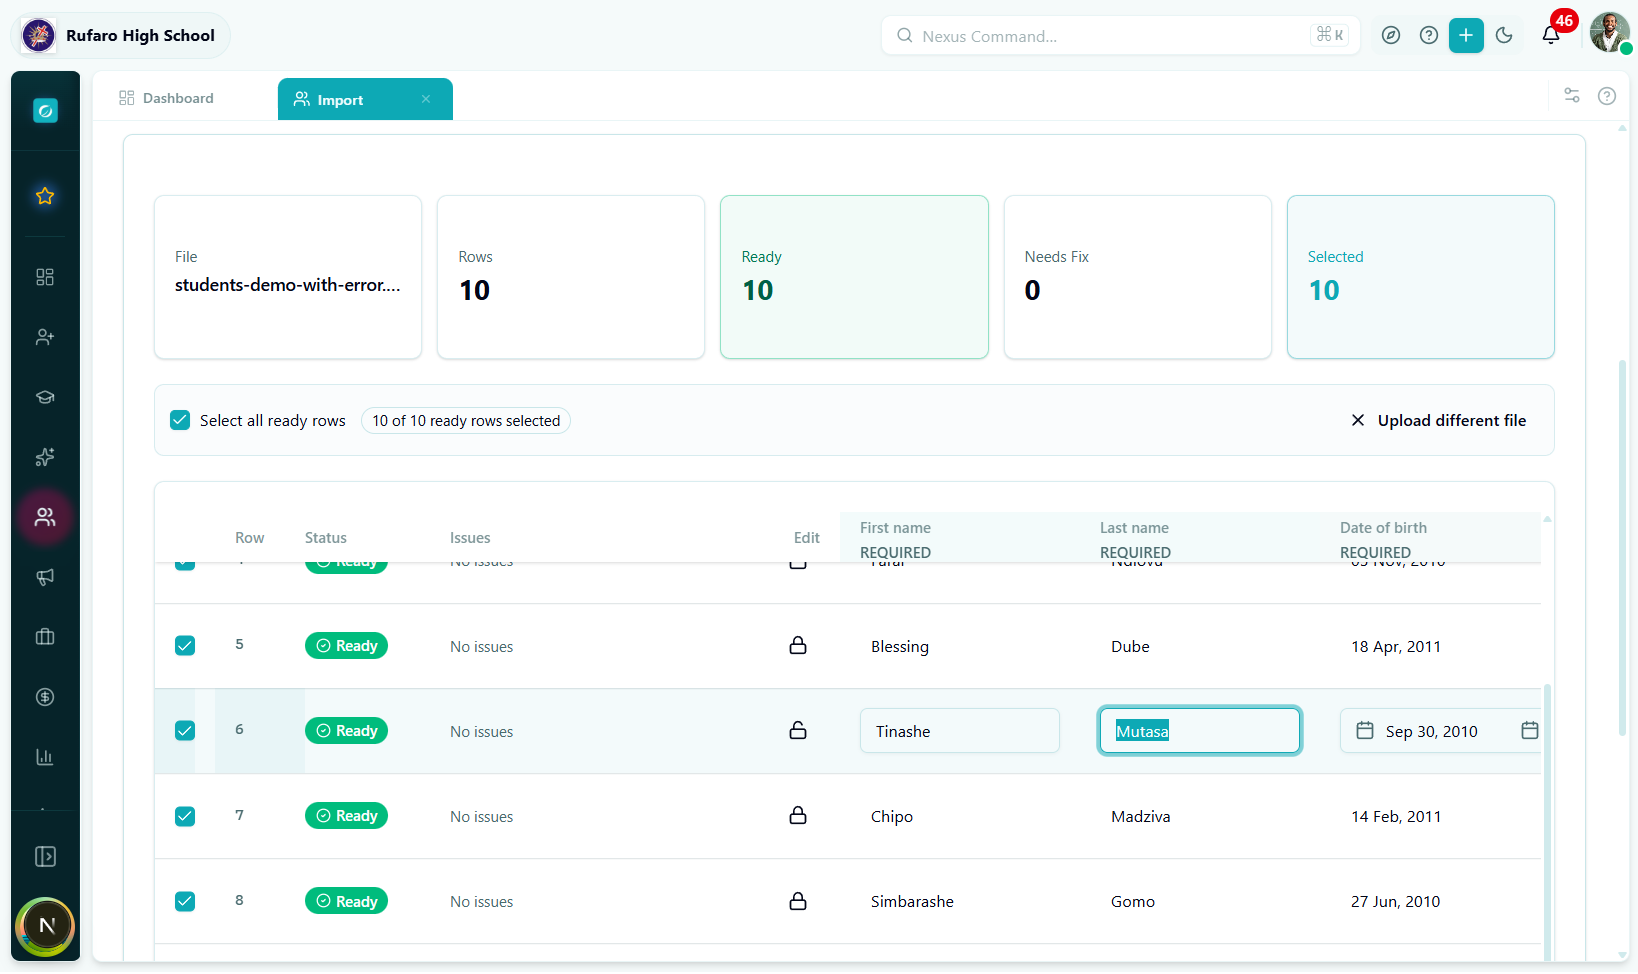
Step 2 — Preview
The Preview step shows every row from your file in an editable table. This is your chance to spot and fix errors before any data is saved.
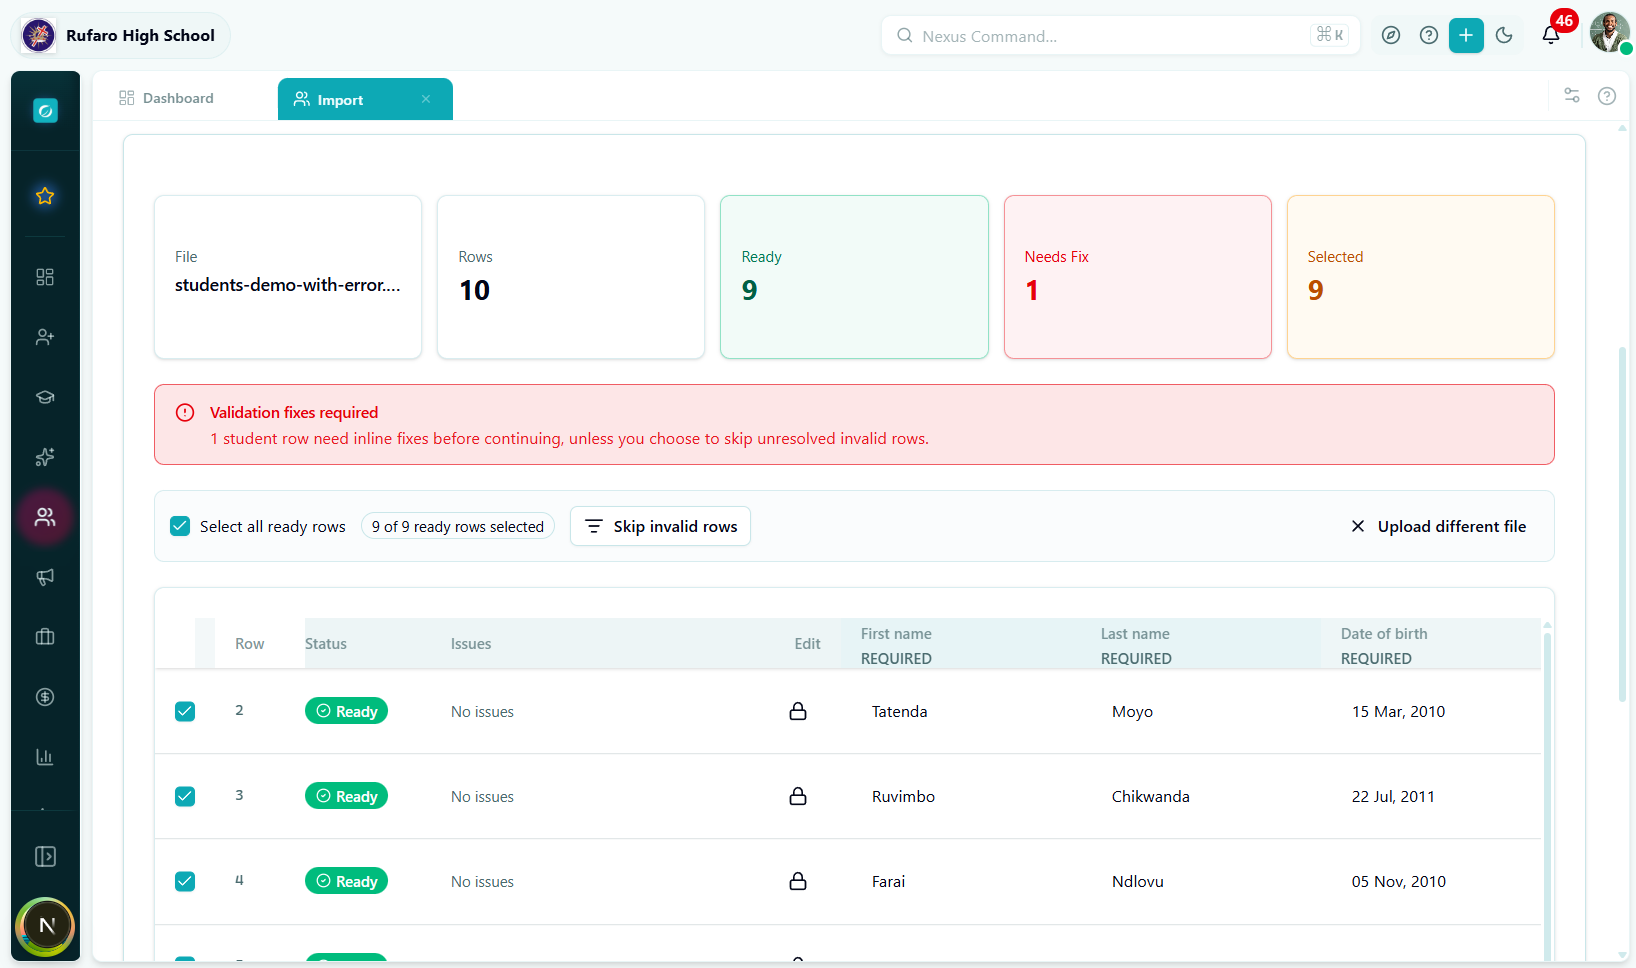
Understanding the row colours
| Row appearance | Meaning |
|---|---|
| White / normal | Row passed all validations |
| Red left border | Row has one or more field errors |
| Grey / dimmed | Row is deselected (will not be imported) |
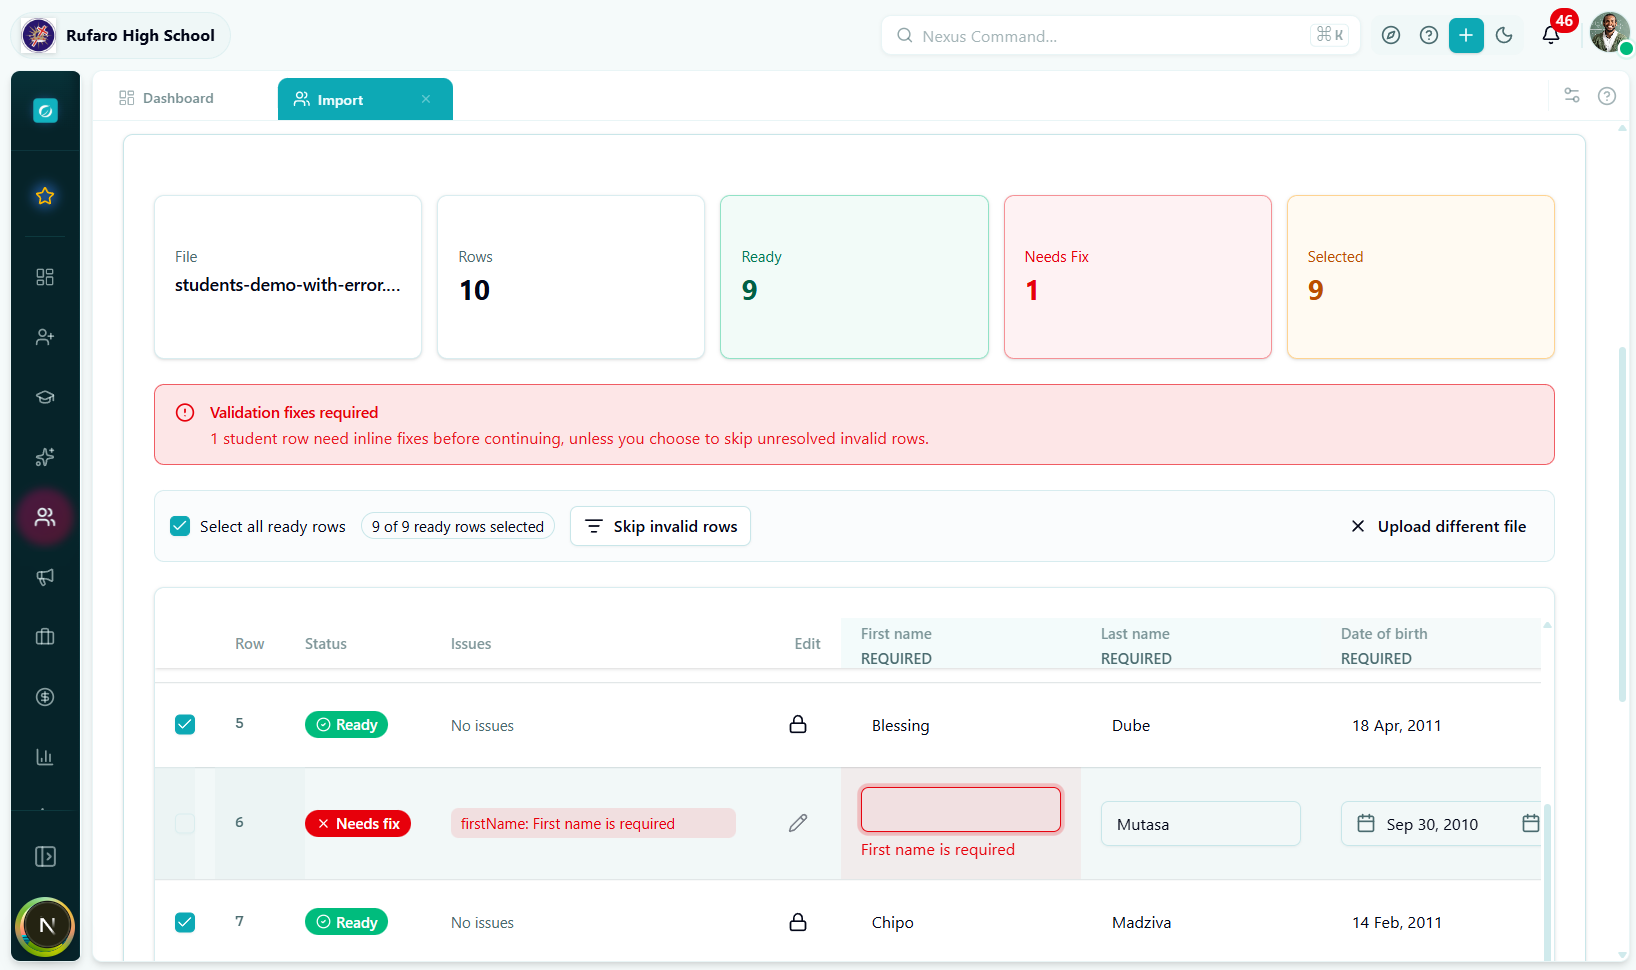
Editing a cell inline
Click any cell to edit its value. The field type determines the input:
- Text / name fields — plain text input
- Date fields — date picker
- Gender / boarding status / etc. — dropdown with accepted values
- Grade level — searchable combobox
- Class division — searchable combobox (filtered by selected grade)
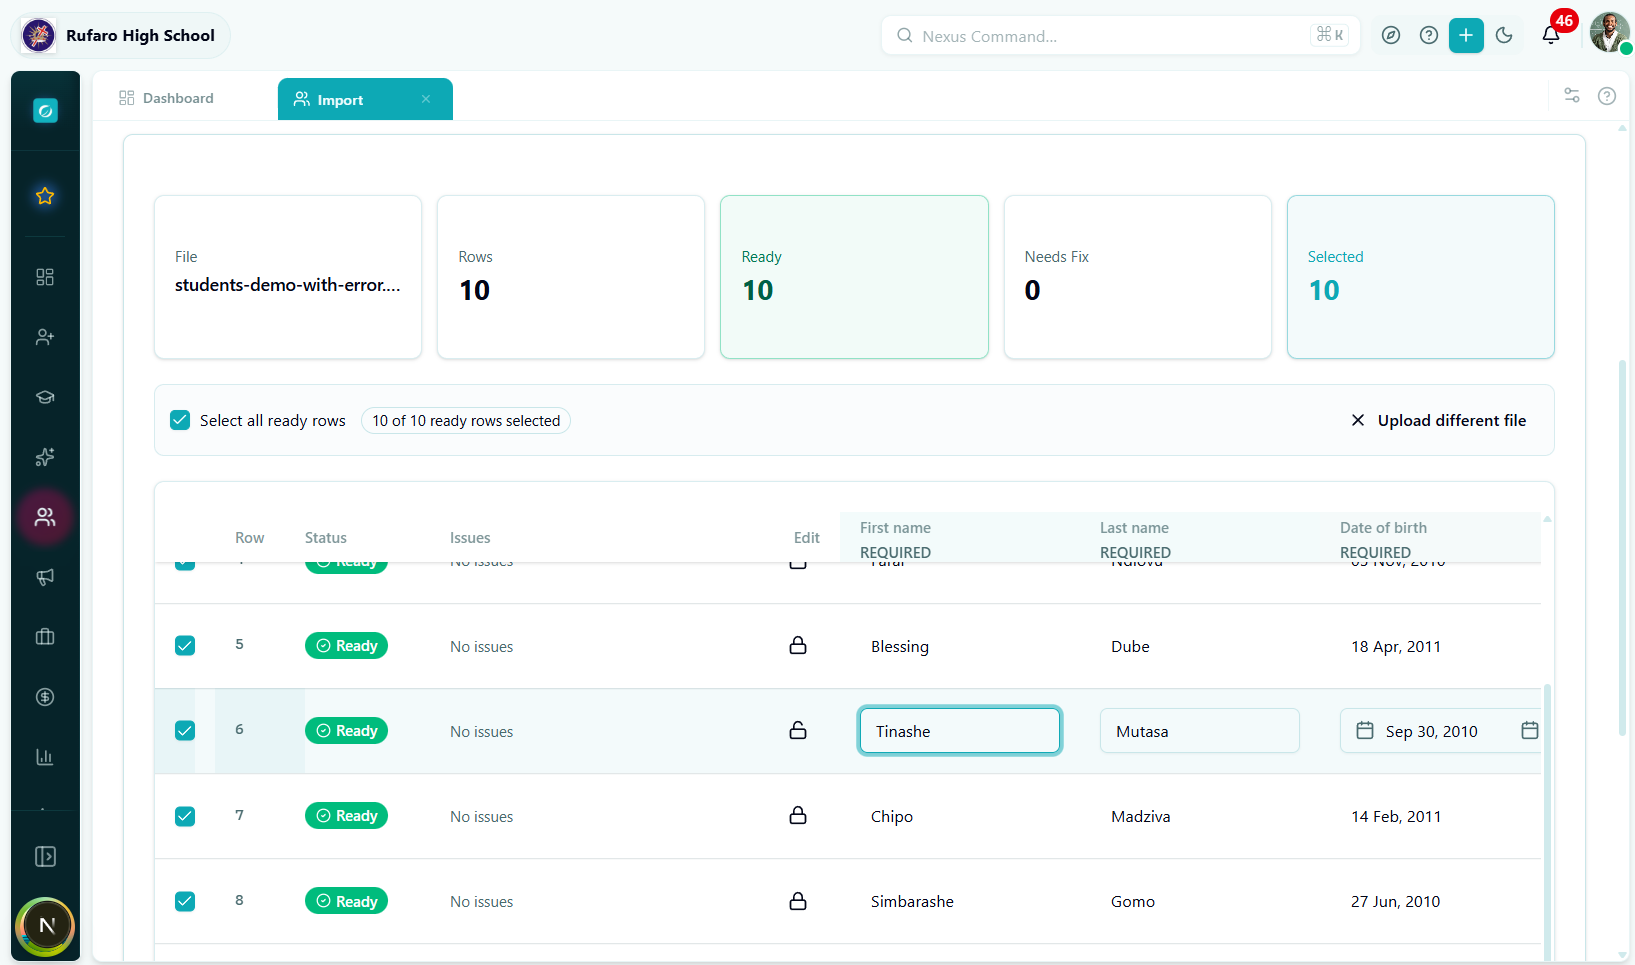
After editing, the row re-validates automatically. A green tick appears when all errors are resolved.
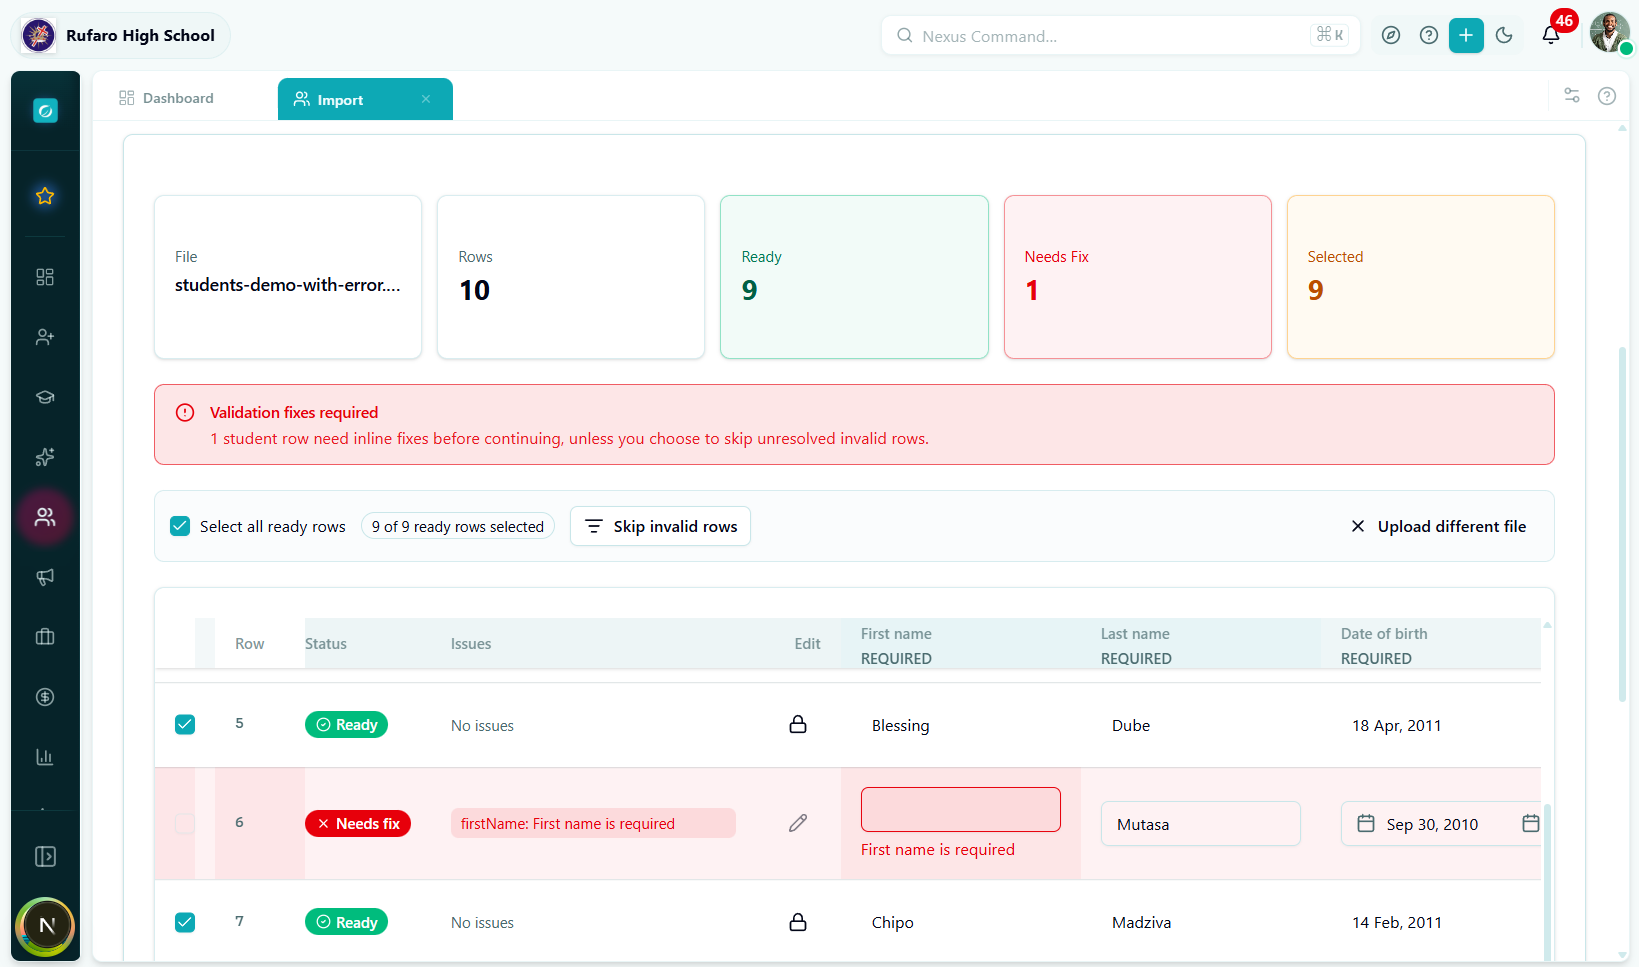
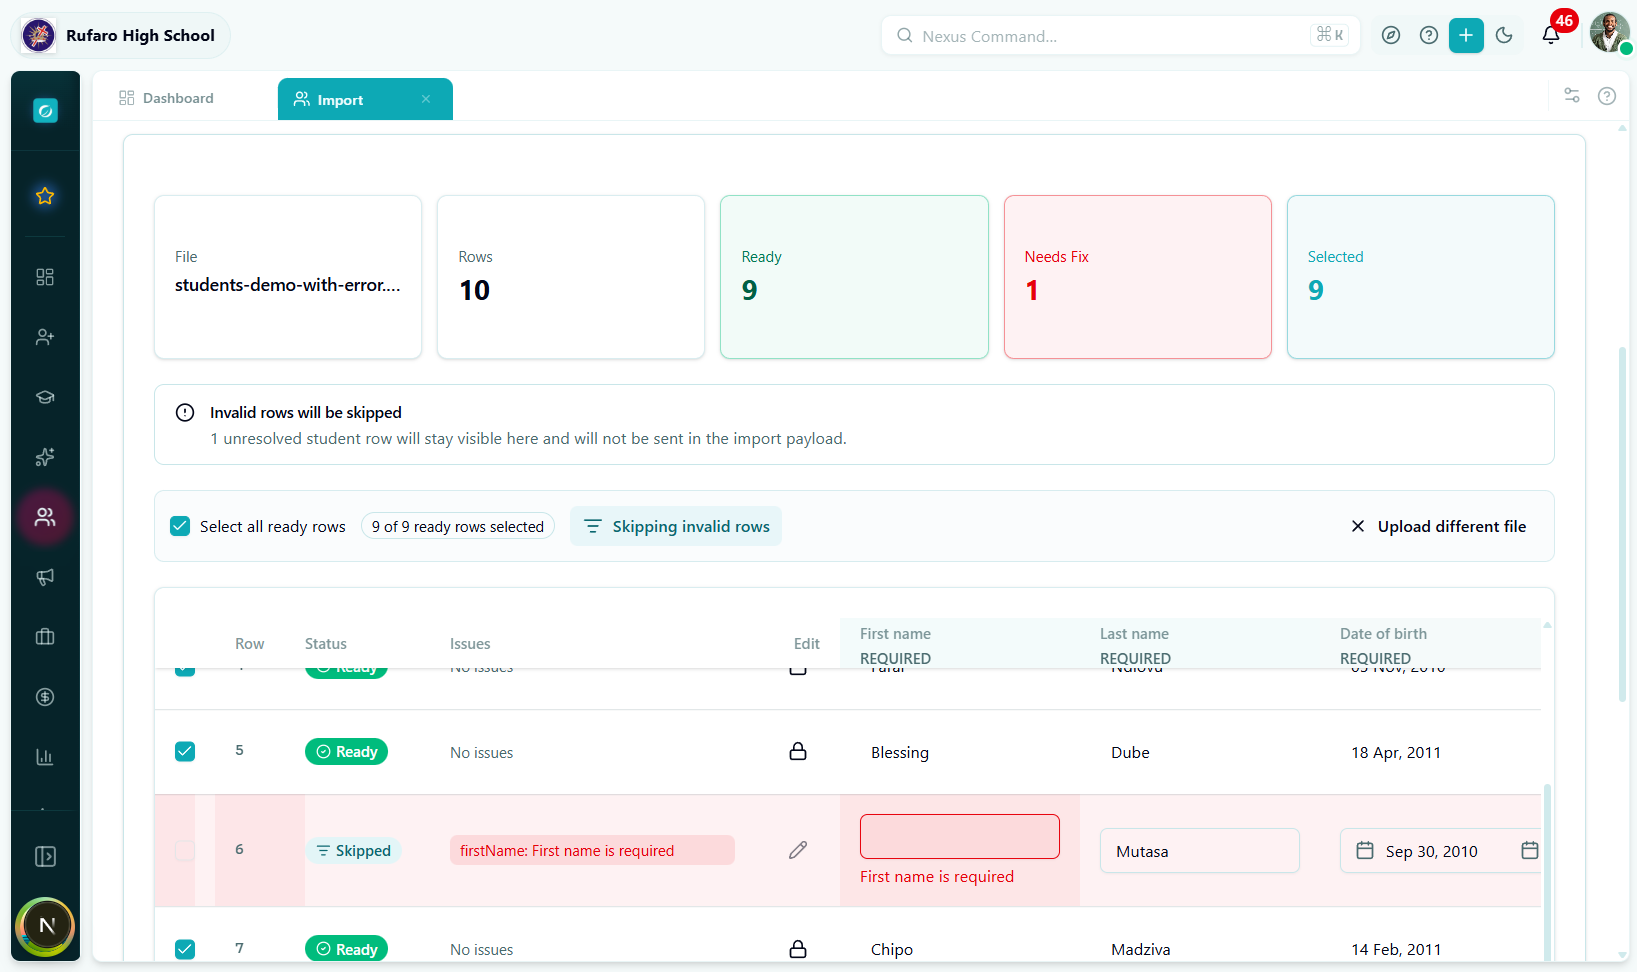
The error panel
Click the red badge on an errored row to expand the error panel below that row. It lists each failing field and why it failed.
Skip invalid rows
If you cannot fix some rows right now, enable Skip invalid rows (toggle at the top of the table). Invalid rows will be excluded from the import; you can fix and re-import them later.
Select / deselect rows
Use the checkboxes in the leftmost column to manually include or exclude individual rows.
- Select All checkbox in the header selects all currently visible valid rows.
- Holding Shift and clicking selects a range.
Locking a row
Once you are happy with a row, click the lock icon (🔒) on that row. Locked rows cannot be accidentally edited.
Click Next to proceed to the Assign step.
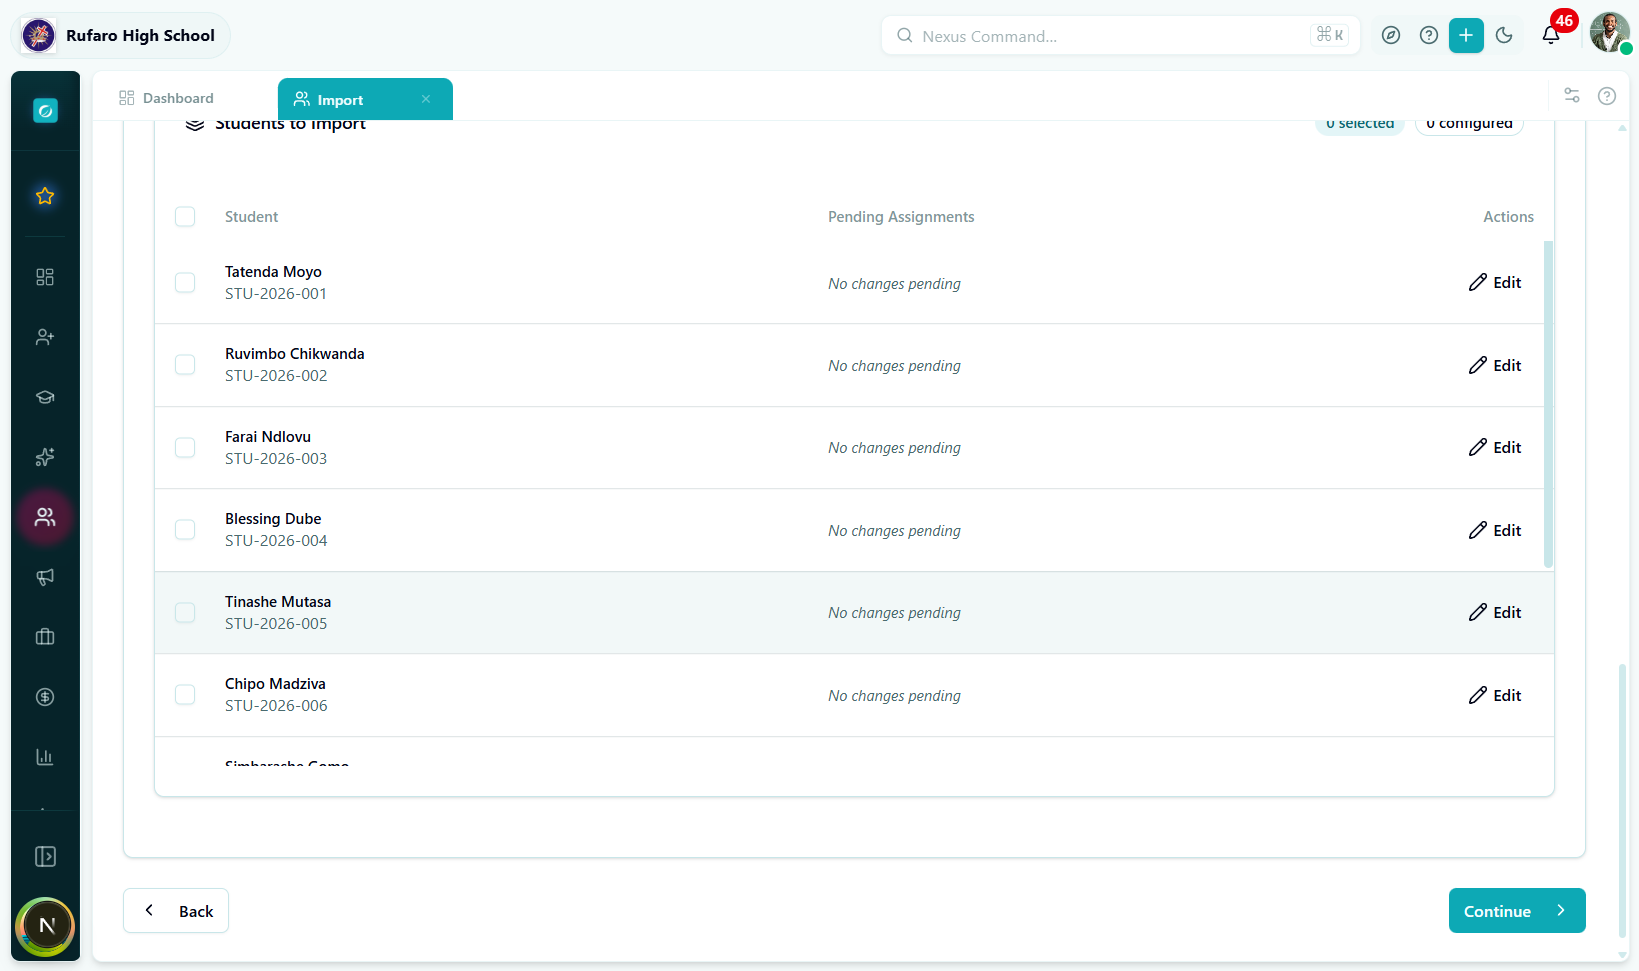
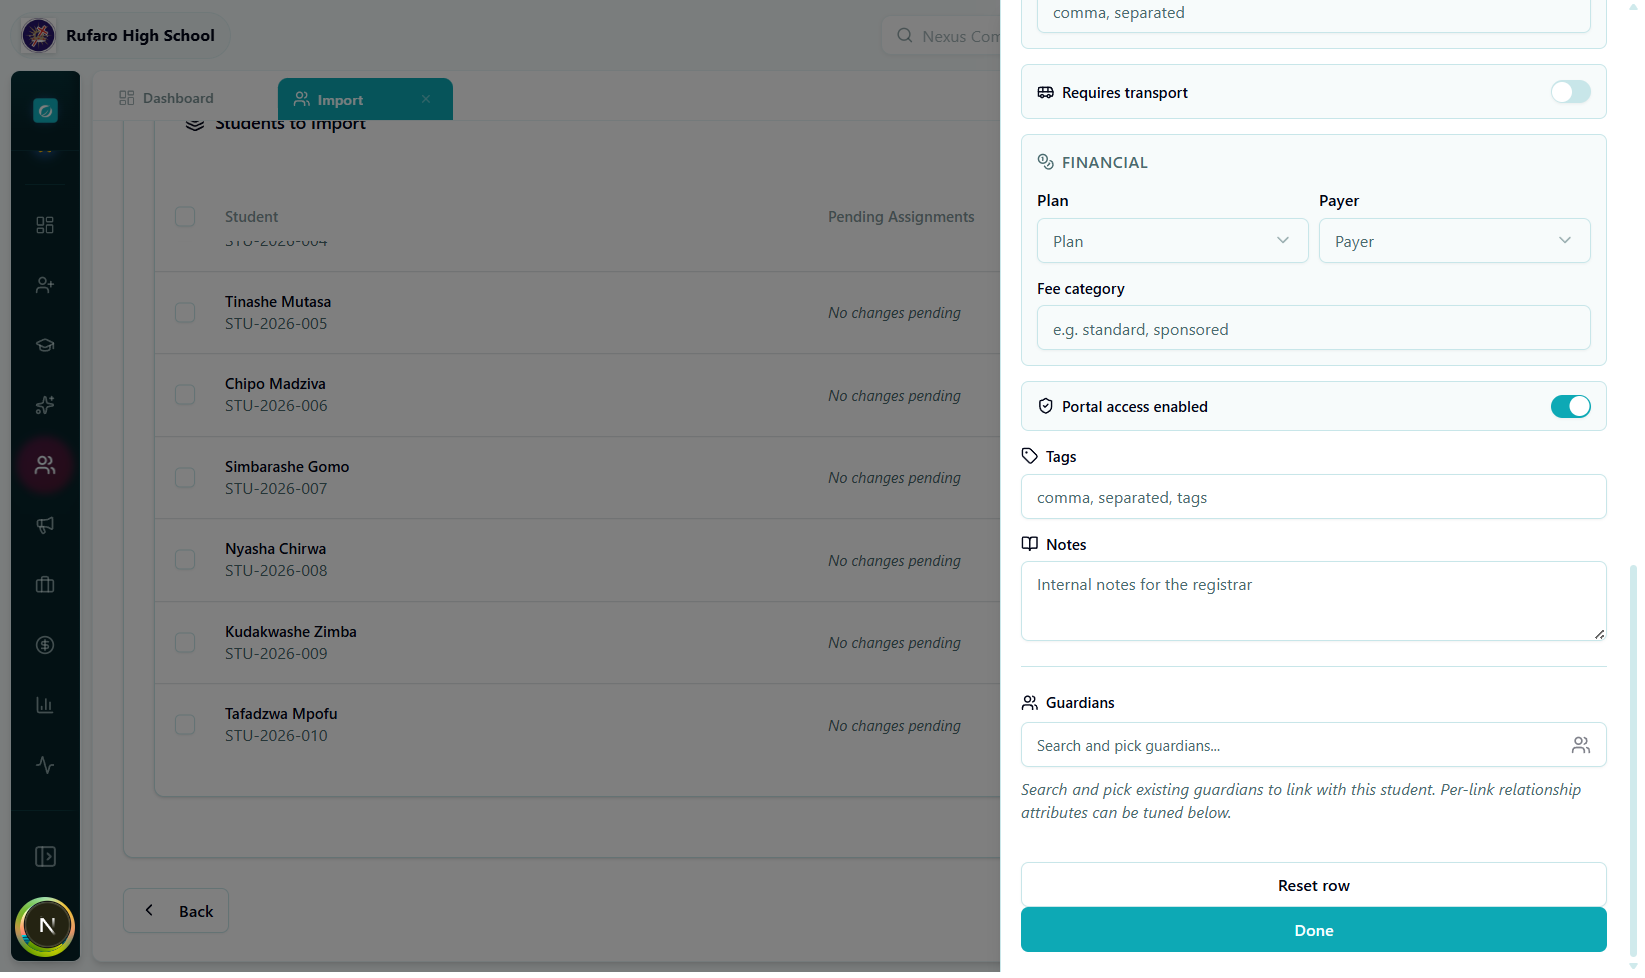
Step 3 — Assign
The Assign step lets you enrich each student's record beyond what can be expressed in a flat CSV. You can configure academic placement, boarding, scholarships, medical details, transport, financials, and guardian links — all before the import runs.

If your CSV already contains placement and enrichment fields, or you plan to add this information later via individual student profiles, you can click Next without expanding any rows.
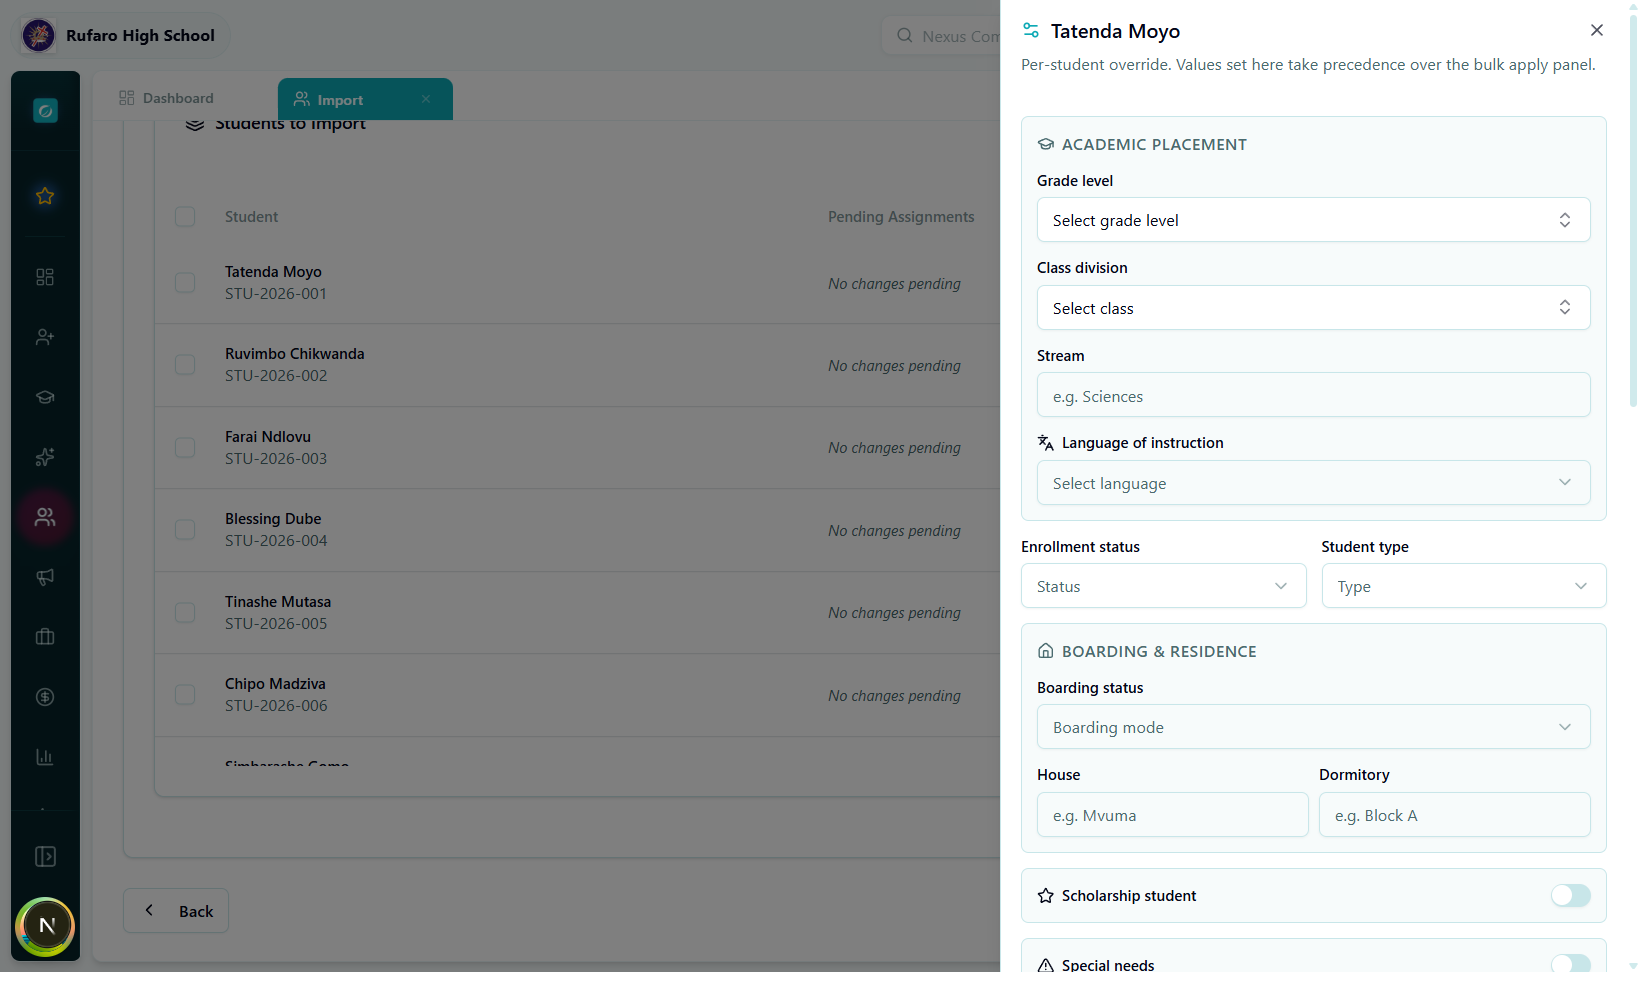
Academic placement
| Field | Description |
|---|---|
| Grade Level | e.g. Grade 8, Form 3 |
| Class Division | e.g. 8A, Form 3B (filtered to selected grade) |
| Stream | Science, Arts, Commerce |
| Language of Instruction | English, Shona, Ndebele |
Boarding
| Field | Description |
|---|---|
| Boarding Status | day, boarding, weekly boarding |
| House | e.g. Nehanda House |
| Dormitory | e.g. Block A |
| Bed Number | e.g. 14 |
Enrollment
| Field | Description |
|---|---|
| Enrollment Status | active, pending, deferred |
| Student Type | regular, transfer, international, exchange |
Scholarship
| Field | Description |
|---|---|
| Is Scholarship Student | Yes / No toggle |
| Scholarship Type | Government, NGO, Private, Sports, etc. |
| Provider | Name of sponsoring organisation |
| Amount | Scholarship value (number) |
Special Needs
| Field | Description |
|---|---|
| Has Special Needs | Yes / No toggle |
| Category | Learning disability, Physical, Visual, Hearing, etc. |
| Details | Free-text notes for staff |
Medical
| Field | Description |
|---|---|
| Blood Type | A+, B−, O+, AB+, etc. |
| Allergies | Comma-separated list |
| Medical Conditions | e.g. Asthma, Diabetes |
| Dietary Restrictions | e.g. Vegetarian, Halal |
Transport
| Field | Description |
|---|---|
| Requires Transport | Yes / No toggle |
| Route | School bus route name |
| Pickup Point | Named bus stop |
| Drop-off Point | Named bus stop |
Financial
| Field | Description |
|---|---|
| Fee Payment Plan | Term, Monthly, Annual |
| Fee Category | Standard, Discounted, Scholarship |
| Payment Responsibility | Guardian, School, Sponsor |
Guardian Linking
This section links each imported student to an existing guardian already in the system. If the guardians haven't been imported yet, you can skip this and link them after import.
To link a guardian:
- Click the Search guardian combobox and type a name or phone number.
- Select the guardian from the list.
- Set the relationship type (Mother, Father, Legal Guardian, etc.).
- Toggle the relevant permissions:
| Permission | What it controls |
|---|---|
| Is Primary Contact | First contact in an emergency |
| Is Fee Payer | Receives invoices and fee statements |
| Lives With Student | Used in address lookups |
| Can Pick Up | Authorised to collect the student |
| Can Authorise Medical Treatment | Signs for emergency procedures |
| Receives Report Cards | Gets academic report notifications |
| Receives Attendance Alerts | Gets absence/tardiness SMS/email |
| Receives Medical Alerts | Gets health incident notifications |
| Receives Fee Statements | Gets billing emails |
You can link multiple guardians to one student. Click + Add Another Guardian to add more.
Tags & Notes
Attach free-form tags (e.g. new-intake-2026, scholarship) and optional internal notes to all imported students at once.
Click Next to proceed to the Options step.
Step 4 — Options
Global settings that apply to every student in this import batch.
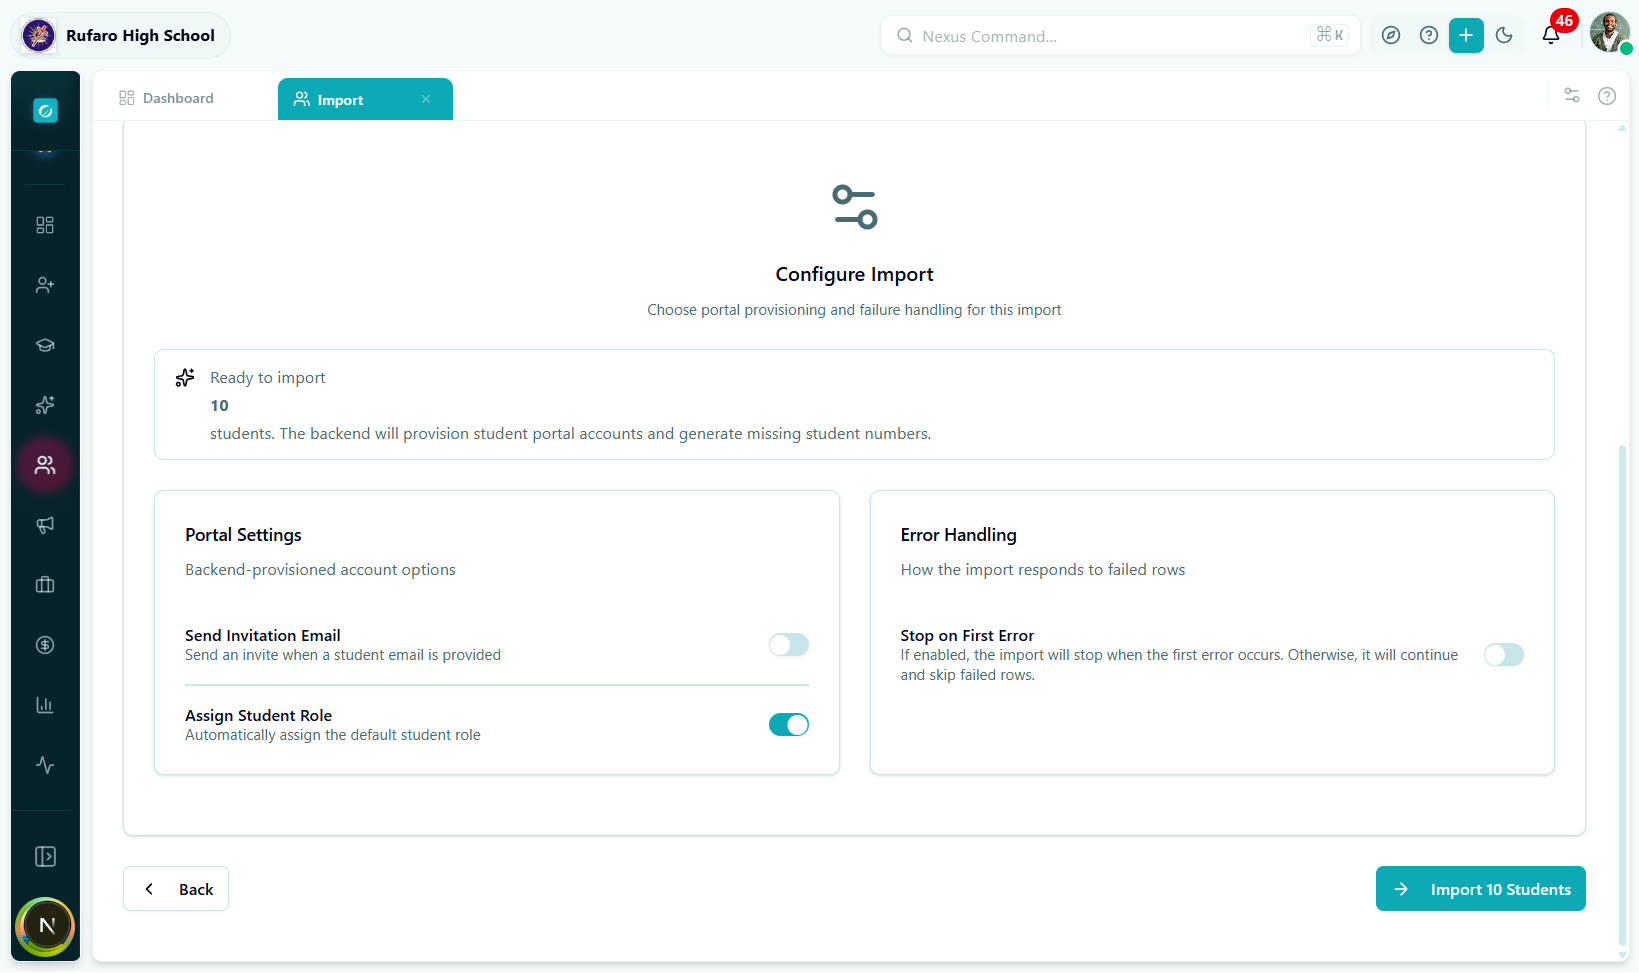
| Option | Default | What it does |
|---|---|---|
| Send Portal Invitation Emails | Off | Sends a welcome email with login credentials to each student's email address immediately after import. Turn this on only if students should have portal access straight away. |
| Assign Default Student Role | On | Automatically assigns the school's default Student role to every imported user account. Turn this off only if you plan to assign roles manually. |
| Stop on First Error | Off | If any student record fails to save, the entire batch is cancelled. Leave this off to allow partial success (failed rows are reported in the Results step). |
If student email addresses are missing or provisional, leave Send Portal Invitation Emails off. You can send invitations individually from each student's profile later.
Click Import to begin the import.
Step 5 — Import (Processing)
The system sends your data to the server. A live progress bar shows how many records have been processed.
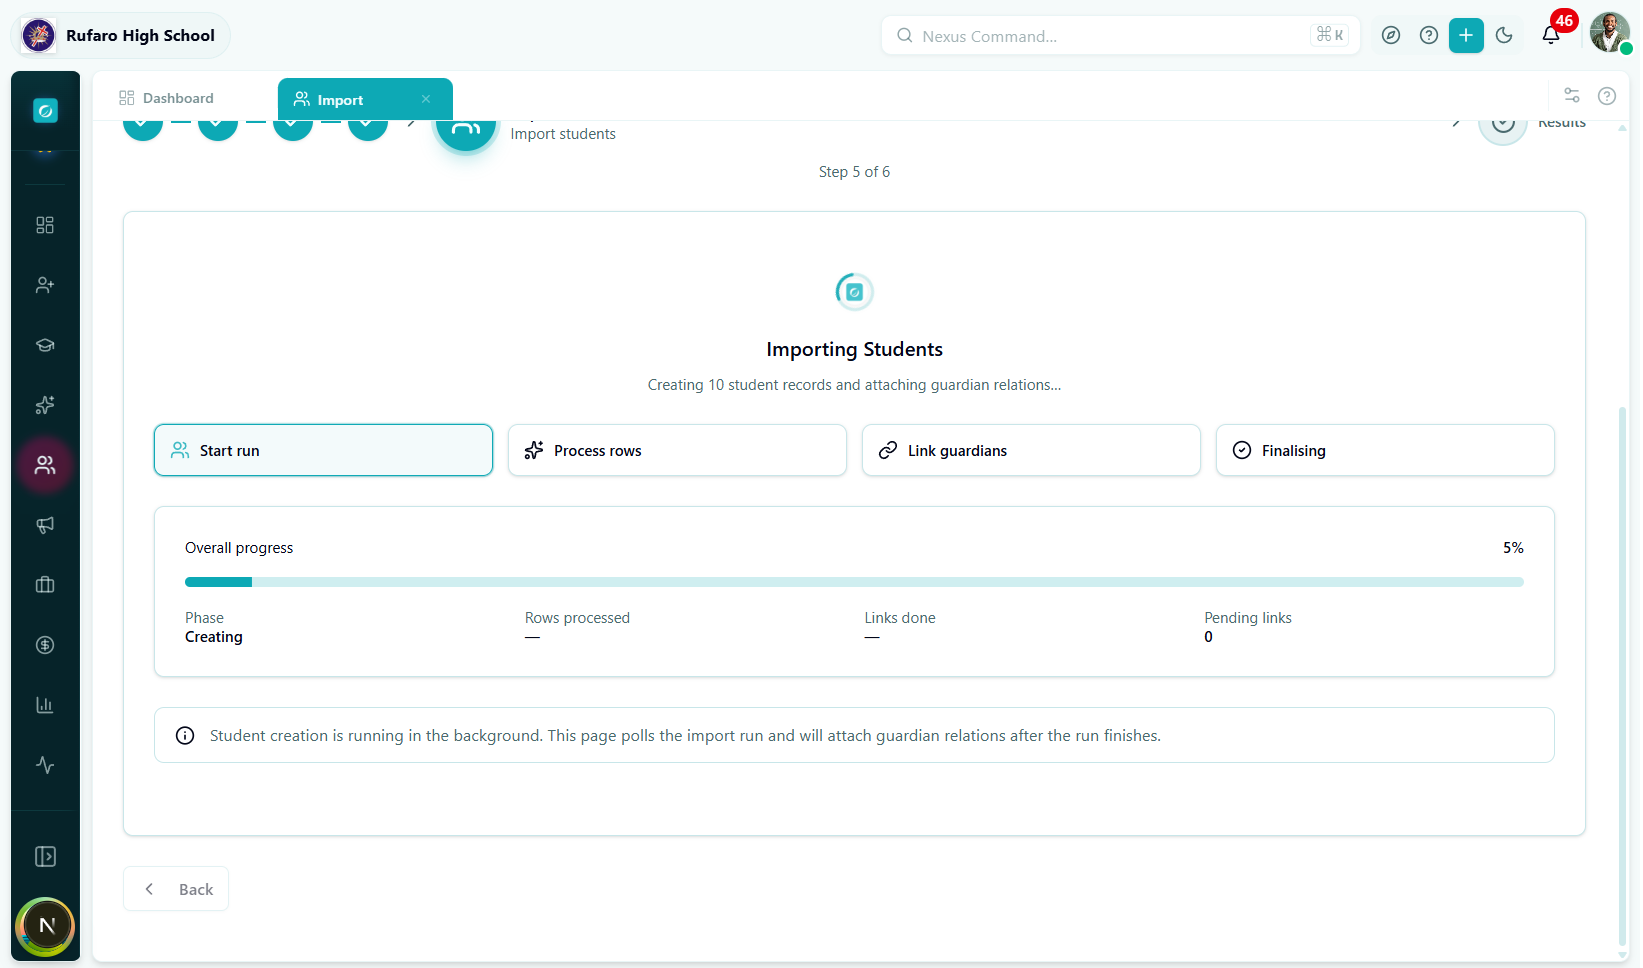
What is happening in the background:
- Student profiles are created in the database.
- If Assign Default Role is on, an IAM user account is created and the role is assigned.
- If Send Portal Invitation is on, invitation emails are queued.
- Guardian links configured in Step 3 are created one by one after the main batch completes.
- The system polls for status every 2 seconds until all records finish.
While the import is running, keep this browser tab open. Closing the tab does not cancel the import (it continues on the server), but you will lose the live progress view and will need to check individual student profiles to confirm success.
Step 6 — Results
After processing completes, the Results step shows a full summary.
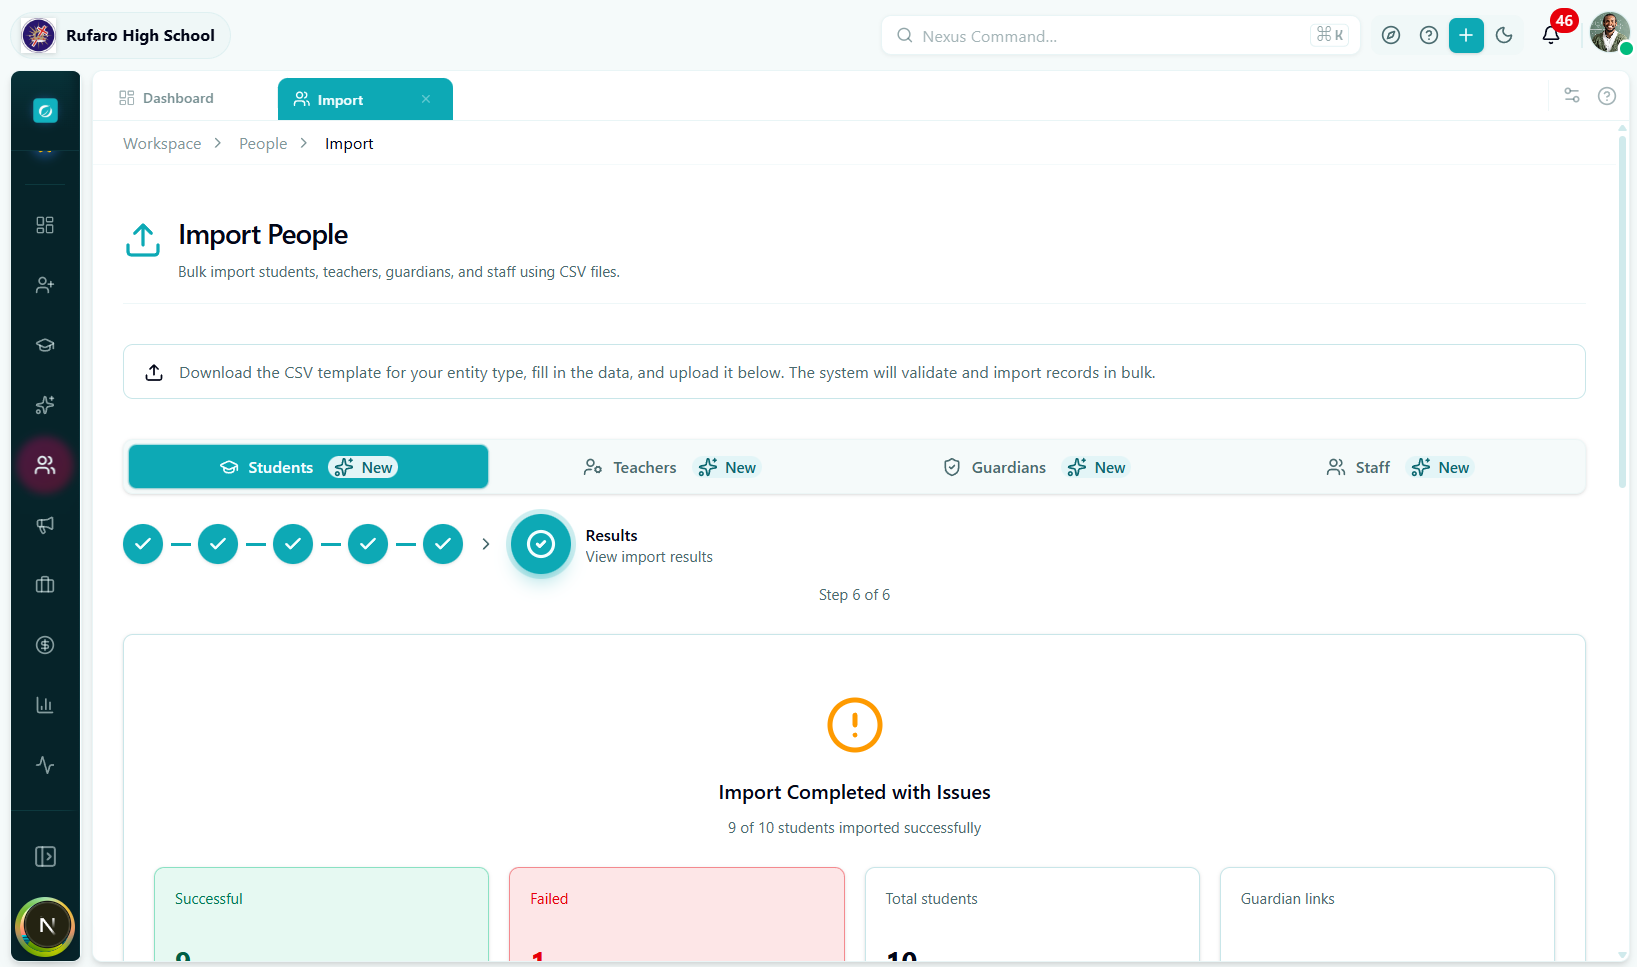
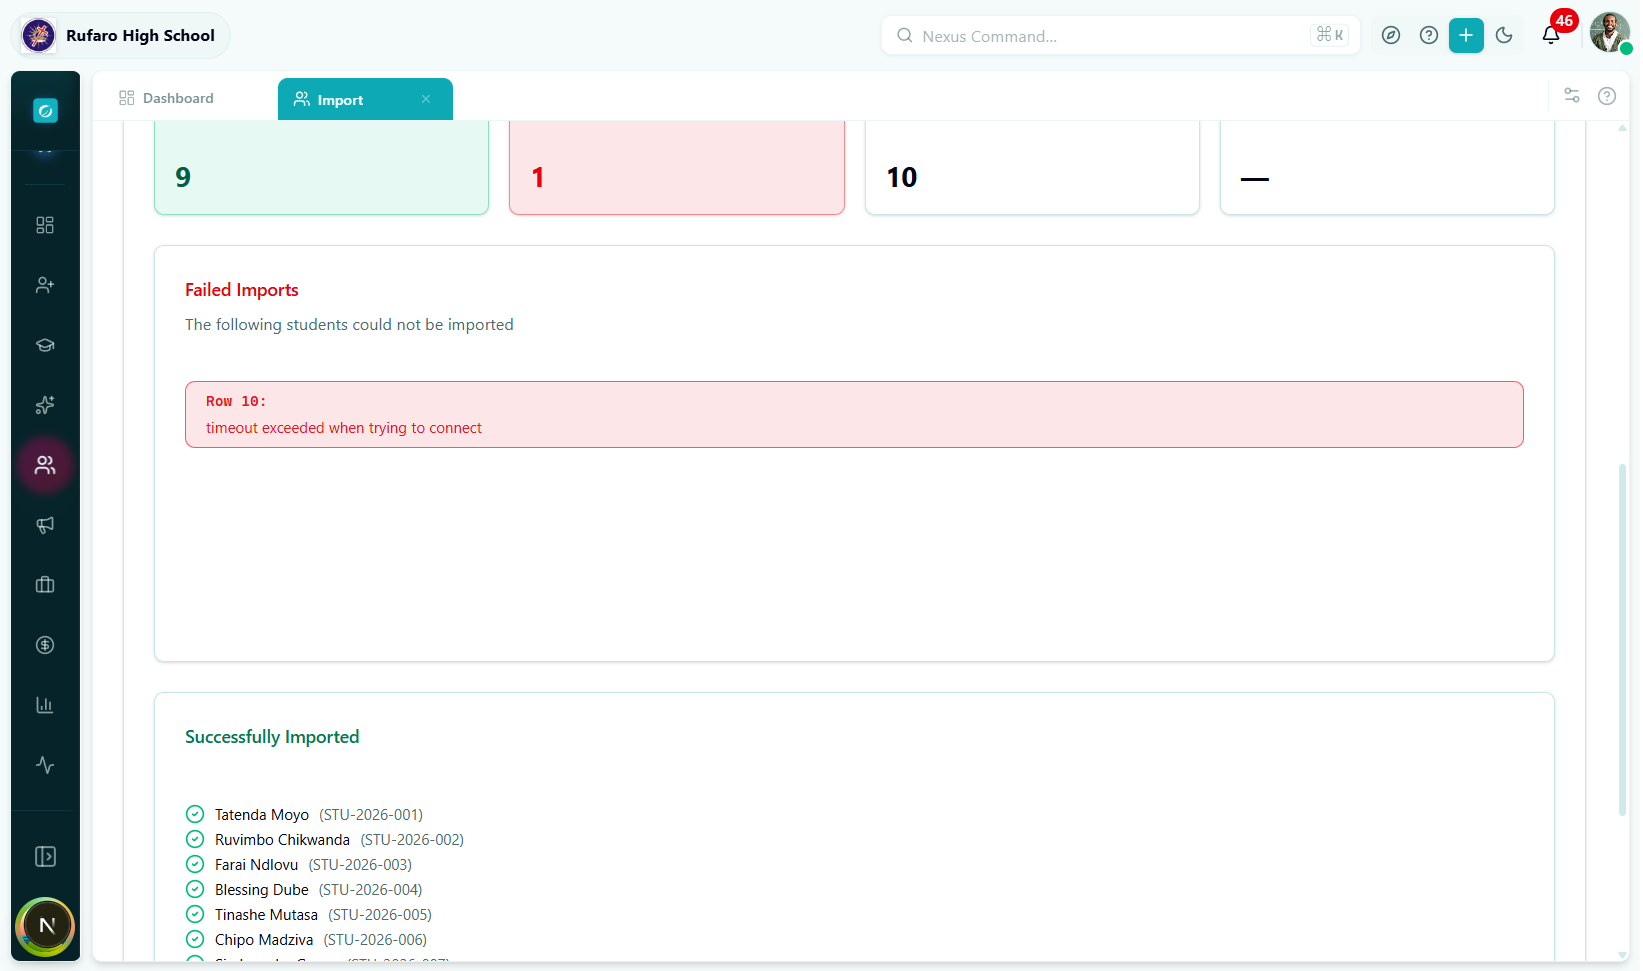
Success summary
| Item | Meaning |
|---|---|
| Green banner | Total number of students successfully created |
| Guardian links badge | How many guardian–student relationships were created |
| Download results | Exports a CSV of results (success and failure rows) |
Error table
If any rows failed, they are listed here with the exact error message returned by the server.
| Column | Content |
|---|---|
| Row # | Position in your original file |
| Name | Student name from the row |
| Error | Human-readable description of what went wrong |
| Field | Which field caused the failure (if applicable) |
After the import
- Click View Students to go directly to the Students list filtered to the newly imported cohort.
- Click Start New Import to run another batch.
- Failed rows can be corrected in your spreadsheet and re-uploaded in a fresh import.
Complete Field Reference
Required fields
| Column header | Format | Example |
|---|---|---|
firstName | Text | Tatenda |
lastName | Text | Moyo |
dateOfBirth | YYYY-MM-DD | 2010-03-15 |
gender | male / female / other | female |
Recommended fields
| Column header | Format | Example |
|---|---|---|
studentNumber | Text (unique) | STU-2026-001 |
email | Valid email | t.moyo@school.ac.zw |
phone | Phone number | +263771234567 |
nationality | Text | Zimbabwean |
enrollmentDate | YYYY-MM-DD | 2026-01-20 |
gradeLevelCode | Text matching a grade in the system | Grade 8 |
boardingStatus | day / boarding / weekly_boarding | day |
Personal details
| Column header | Format | Notes |
|---|---|---|
middleName | Text | Optional |
preferredName | Text | Nickname shown on registers |
placeOfBirth | Text | City or town |
citizenshipStatus | Text | e.g. citizen, resident, alien |
nationalId | Text | National ID number |
birthCertificateNumber | Text | |
passportNumber | Text | |
alternativePhone | Phone number | Second contact number |
Academic placement
| Column header | Format | Notes |
|---|---|---|
enrollmentStatus | active / pending / inactive / graduated / transferred / expelled | Default active |
studentType | regular / transfer / international / exchange / part_time | Default regular |
stream | Text | e.g. Science, Arts |
languageOfInstruction | Text | e.g. English |
Boarding & accommodation
| Column header | Format | Notes |
|---|---|---|
house | Text | House name |
dormitory | Text | Dormitory block/name |
bedNumber | Text | Bed or bunk number |
Scholarship
| Column header | Format | Notes |
|---|---|---|
isScholarshipStudent | true / false / yes / no | |
scholarshipType | Text | e.g. Government, NGO, Sports |
scholarshipProvider | Text | Organisation name |
scholarshipAmount | Number | Annual amount |
Special needs
| Column header | Format | Notes |
|---|---|---|
isSpecialNeeds | true / false / yes / no | |
specialNeedsCategory | Text | e.g. Learning Disability, Visual |
specialNeedsDetails | Text | Free-text description |
Medical
| Column header | Format | Notes |
|---|---|---|
bloodType | A+ / A- / B+ / B- / O+ / O- / AB+ / AB- | |
allergies | Comma-separated | e.g. Peanuts, Penicillin |
medicalConditions | Comma-separated | e.g. Asthma, Diabetes |
dietaryRestrictions | Comma-separated | e.g. Vegetarian, Halal |
Emergency contact
| Column header | Format | Notes |
|---|---|---|
emergencyContactName | Text | Full name |
emergencyContactPhone | Phone number | |
emergencyContactRelationship | Text | e.g. Mother, Uncle |
Transport
| Column header | Format | Notes |
|---|---|---|
requiresTransport | true / false / yes / no | |
transportRoute | Text | Route name |
transportPickupPoint | Text | Named stop |
transportDropoffPoint | Text | Named stop |
Financial
| Column header | Format | Notes |
|---|---|---|
feePaymentPlan | term / monthly / annual / custom | |
feeCategory | Text | Fee tier name |
paymentResponsibility | guardian / school / sponsor | Who is invoiced |
Portal access
| Column header | Format | Notes |
|---|---|---|
portalAccessEnabled | true / false / yes / no | Whether a login account is created |
Other
| Column header | Format | Notes |
|---|---|---|
tags | Comma-separated | e.g. new-intake, scholarship |
notes | Text | Internal staff notes |
Common Errors & How to Fix Them
File errors
| Error message | Cause | Fix |
|---|---|---|
Invalid file type | File is not .csv, .xlsx, or .xls | Save your file as CSV or Excel and re-upload |
File size exceeds 10 MB | Too many rows or images embedded | Remove images; split into smaller batches |
Missing required columns: [list] | Column headers are misspelled or missing | Compare your headers to the template exactly |
No rows found after skipping header | File only has a header row or is empty | Add at least one data row |
Row validation errors
| Error message | Cause | Fix |
|---|---|---|
dateOfBirth: invalid date | Unrecognised date format | Use YYYY-MM-DD (e.g. 2010-03-15) |
gender: invalid value | Gender value not recognised | Use male, female, or other (lowercase) |
email: invalid email address | Malformed email | Check for spaces or missing @ |
phone: invalid phone number | Bad format | Use international format +263... or local 07... |
enrollmentDate: invalid date | Date cannot be parsed | Use YYYY-MM-DD |
studentNumber: must be unique | Duplicate student number in the file | Remove duplicates or leave studentNumber blank to auto-generate |
Import errors (server-side)
| Error message | Cause | Fix |
|---|---|---|
email already exists | Another account already uses this email | Use a different email or leave blank |
studentNumber must be unique | Student number already taken in the database | Change the student number or leave blank |
schoolId not found | School selection mismatch | Verify the correct school is selected in the top navigation |
gradeLevelCode not found | Grade level does not exist in this school | Check academic setup; ensure grade levels are configured |
classDivisionId not found | Class division not created yet | Create the class division in Academics before importing |